Over the end-of-the-year holidays, I have been busy remodeling some rooms in my house. We recently had new flooring installed, and so all the rooms had been cleared for that job. We decided to take advantage of that and do some more remodelling. We have been wanting to get rid of the “popcorn” ceilings for a while and also paint the walls.
Popcorn Off
After doing some Google searches and watching some YouTube videos, we figured out how to remove the popcorn texture. We prepped the room with plastic sheets and tape — we didn’t want to mess up the newly laid laminate flooring — and managed to scrape out all the popcorn stuff from one of the rooms.
Time for New Texture
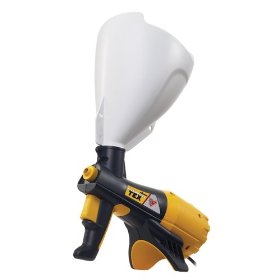
Now it was time to apply new texture. There were several choices that I considered. Texturing by hand using trowels and rollers was the first thing I considered. I soon figured out that for the “knock-down” texture that I was planning to apply on the ceilings, I would have to use either the aerosol spray cans or a powered texture sprayer. Since I was going to work on the ceilings of three rooms, I decided to try the Wagner Power Tex that was selling at Home Depot for about $93.
This being my very first attempt at applying texture, I was a bit apprehensive. As it turned out, it took me a couple of trials to get it right.
Versatile
The Power Tex sprayer comes with three nozzles. Using this and the appropriate thickness of the texture compound and how far you pull the trigger, you can get a range of textures: “simulated accoustic,” “orangepeel” and “knock-down”, and each of these can be “fine,” “medium” or “coarse.” As you can see, you need to get everything right to get the exact texture you desire.
The “black” (smallest) nozzle using mixture with the consistency of milk-shake, with trigger pulled about half-way gave me a good orange-peel texture on the ceiling of one room. I wanted the knock-down look on the ceiling of another room, and the “white” (biggest) nozzle with mixture that looked like pancake batter with the trigger pulled all the way gave me a splatter suitable for knock-down effect. To complete the knock-down texture, you need to wait for the texture to be almost dry and use a long straight edge like a paint-shield or a trowel and “knock down” the “peaks” in the texture. Figuring out exactly when to start knocking down and how much force to apply is another thing that takes practice.
Handy, But Takes Practice
Having used this sprayer to apply texture on the ceilings of two rooms, I can say that this is a good tool to use if you are planning to texture large areas, either walls or ceilings. It works well, but like any tool, you need to practice on a piece of cardboard or a real wall to make sure you get a good feel for it. It does a great job, and it also very easy to clean.
A Word of Caution
Applying texture is a very messy job. You need to really protect all areas that are not to be textured; this includes walls, furniture, closets,…. pretty much everything other than the wall or ceiling that you intend to texture. Also wear protective eye-glasses and respirators when working on this project. Many of the homes have popcorn or other texture that contains asbestos. You need to take special care to get a sample examined to see if there is asbestos, before attempting to remove it. If there is, you might want to consider getting it done professionally.


Be First to Comment